Compiler-based Completion

How Completion Works

The IntelliJ-Haxe plug-in tries its best to give useful completions.  It does this by scanning all of the files in the project and its libraries, and keeping an index of those types.  When completion is requested (normally, via the Ctrl+Space key combination) on a partial word, the plug-in compiles a list of variable names and types that can occur that the caret (cursor) position, using any available characters at the left of the caret as a filter (e.g. to limit the list to those that match the typed characters).  There are several types of completions that are normally completed: Exact match, partial match (for mis-spellings), and CamelCase matches (e.g. use capitalized characters as if they were each the first letter in a sequence of words — allows “CH” to match “CamelHump”).  The plug-in tries to put the five most likely matches at the beginning of the list, and the rest are sorted alphabetically.

In practice this all works fairly well.  However, the plug-in doesn’t have “typing” information; it doesn’t know about unification, monomorphing, and the current type of a dynamic variable.  That sort of information is determined by the compiler.  Fortunately, the compiler team has realized that it’s difficult for IDEs to do such a thing and has created a mode of the compiler that will do the typing and return this information.  You can read about it in the Haxe Manual.

Compiler-based Completions

As of release 0.11.0, the Haxe plug-in can use the compiler to determine the typing results and give a better completion list.  However, it is at the cost of computation time and thus is disabled by default.  You can turn it on via the Haxe SDK sub-dialog (“File->Project Structure->SDKs-><HaxeSDK>”) in the completion section: check the “Use Compiler” checkbox.  If you would like to see all of the plug-in and compiler suggestions, then uncheck the “Remove Duplicates” check box.

Compiler Completions Check Box

(Note: Sometimes — especially on MacOS — the completion section of the dialog does not appear.  It normally appears if you change focus to another subsection, then return.)

Errors

There are a few errors that can occur when using compiler completion.  The first is simply that the project is not set up correctly.  In this case, when completion is attempted you will the error displayed in the status bar and see one of two types of messages inside of the editor, depending upon whether the plug-in itself has any results.  If it does not, then you will see a tooltip message like so:

Tooltip shown when an error occurs and there are no other suggestions.
Completion error from the compiler.

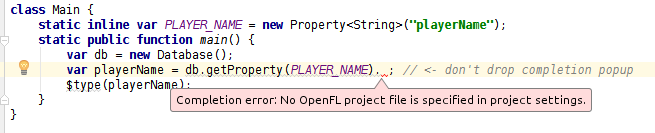
If the plug-in does have suggestions, then the message will be displayed in the bottom of the suggestion box:

Completion error when there are suggestions.
Completion error when other suggestions are available.

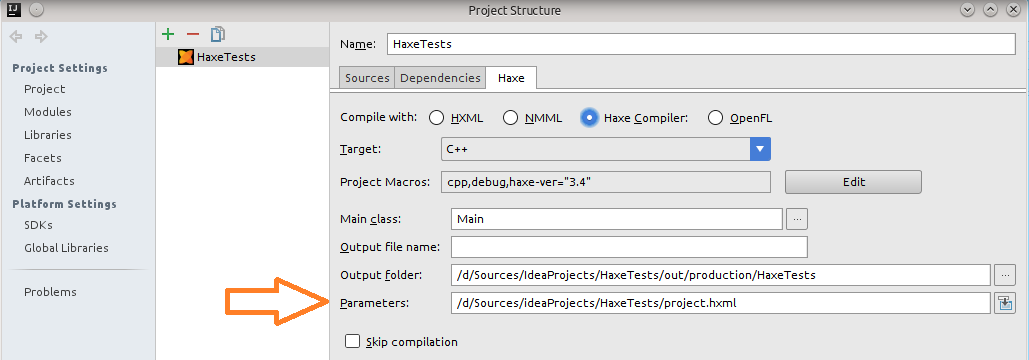
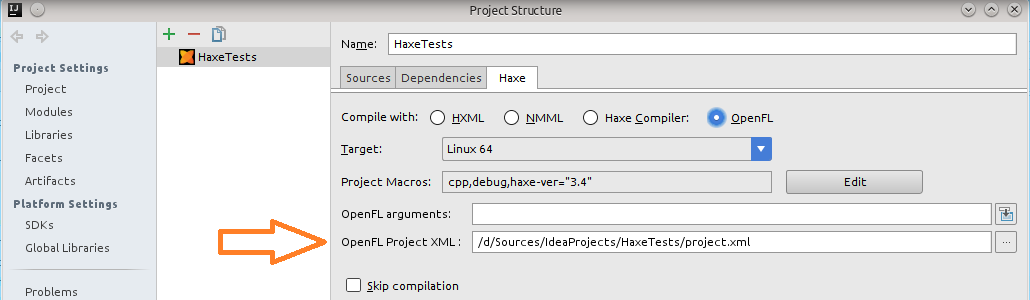
In this particular case, the problem is that the plug-in doesn’t have a project file to present to the compiler.  That can be fixed in the Project Structure dialog (“File->Project Structure->Module->Haxe”):

Where to place the project file path name.
Project file position for OpenFL projects.

Other errors can certainly occur, and when they do, the first message from the compiler is displayed, along with the source file and line number that caused the compiler to stop:

Error message from compiler when completion fails.

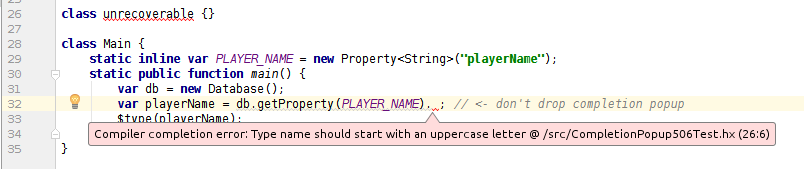
The same message will display at the bottom of the suggestion list if the plug-in was able to generate some completions.  (Unfortunately, creating a hyperlink out of the message turned out to be impossible using IDEA’s tooltip/dialog implementation.)

Haxe 3.2 issues

Completion was experimental and incomplete with Haxe versions between 3.2 and 3.4.  Many of the error messages are incomplete and/or incorrect.  For instance, you may see the message “package Foo should be src/Foo.”  There is really another error with the compilation, but the compiler had bugs that prevented correct messages from being returned.  With Haxe version 3.4, much effort was put into better completion services and getting better error messages.  If you can upgrade, you will have a much better experience with completion.

Better performance by using the compiler’s cache for completions

When compiler completion was introduced in 0.11.0, the plug-in did not try to take advantage of the compiler’s completion cache to get better performance, but you can set it up yourself.  The important things to know are:

  • The completion cache needs to be started independently.
  • The cache needs to be warmed up.
  • It doesn’t work with OpenFL.

Starting the compiler cache

To start the cache independently, run the compiler as described in Section 8.3.8 of the Haxe manual.  Externally to IDEA, start the compiler in --wait mode:

haxe -v --wait 6000

Then, add the following to your project file (modify as appropriate for the target type):

--connect 6000

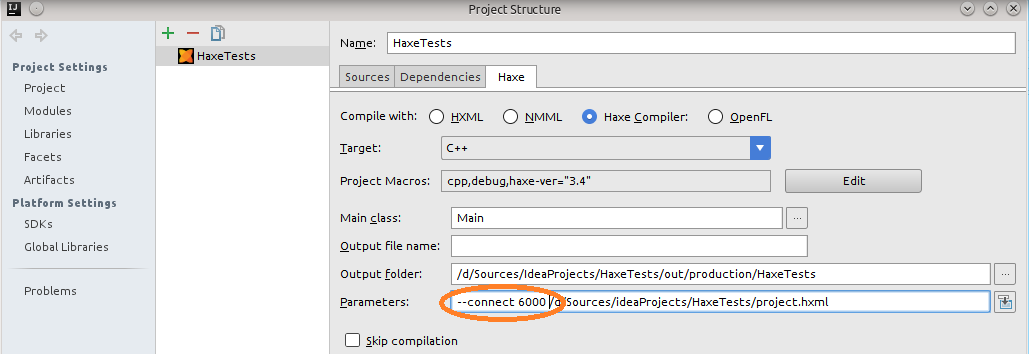
Or, you can add it to the command line in the project structure dialog:

Adding completion server parameters.
Where to manually add completion server parameters.

Warming the cache

Like all caches, the compiler’s completion cache can only improve performance if it already has the information requested.  It doesn’t start out with that information; that has to be generated and loaded at some point.  That makes the initial request slower (but no slower than not using a cache at all).  The concept of pre-loading the cache is known as cache warming.  Some of the other IDEs that use a compiler cache — notably vshaxe — warm the cache by performing a complete compile when the IDE starts.  You can do the same by adding the --connect parameter to your project file and performing a full compile.  Just be sure to make the compile from within IDEA, or ensure that there are no differences between the parameters used in your external build and the ones specified in the project structure dialog.  If the parameters are different, then the compiler will determine that the cached data is invalid and will ignore the data it has already cached (and will try to save the new results in the cache).

This leads us to why OpenFL is problematic…

Why OpenFL breaks the cache

IDEA attempts to determine the set of arguments that are necessary for a completion request to the compiler.  For OpenFL projects, it relies upon the display functionality of the openfl command. display doesn’t create the same set of parameters as it does for a compile run, and you can’t get openfl to call the compiler for completion results. So, OpenFL projects can’t be sped up in this fashion. (At least until the OpenFL project fixes display. Once they do, then IDEA will “magically” start using the proper parameters.)

Debugging

Unfortunately, IDEA Community Edition currently will not start an IDE-based debugging session.  For that, IDEA Ultimate is required. (EAP is free and may work, though it’s technically unsupported.)  

Command-line debugging for C++ projects is always available because that is a feature of the Haxe language itself.

Debugging JavaScript Targets

*We need someone who has done this to fill in this section.*

JavaScript debugging is not supported within IDEA itself.  However, the Haxe compiler does create source maps that browser debuggers can use for source level debugging.

Debugging Flash Targets

(Note: The plugin team does not use these targets regularly.  Accordingly, these instructions need review and clarification by a regular user.  Please let us know of deficiencies.)

Flash targets require a Flash player or AIR player to be installed.  IDEA can use either.  See Adobe’s Getting Started page, to get an appropriate environment set up.

The Flex plugin must be installed within IDEA.  It is shipped with IDEA by default, but you have to visit the Settings to enable it.  (File->Settings->Plugins; make sure that Flex is enabled.)

Start a debugging session via the normal means (Run menu, Ladybug icons, Shift-F9 key, etc.).  The plugin will launch FlashPlayer/AIR debugger, create a connection to it, and then immediately launch the .SWF file from the compilation.  If it’s an OpenFL project, lime will be used to launch the app.  For other project types, the .SWF is launched as if it were a command.  Therefore, you must have your OS environment set up to run the associated viewer.  (For Windows, this would be “ASSOC .swf-ShockwaveFlash.ShockwaveFlash”)

There is an excellent YouTube Video by Jason Sturges on how to set up Flash Debugging for Mac OS.  (It’s roughly the same process for other platforms.)

Debugging C++ Targets

See the hxcpp-debugger project for more information.

C++ projects can be debugged in source mode directly in IDEA.  To do so, you must include the hxcpp library in your project and start the debugger in your code.

The hxcpp debugger functionality conforms to the Haxe v3.0 debugger. In order to use this, you must:

  • Install the *VERSION 1.1* debugger haxelib from https://github.com/HaxeFoundation/hxcpp-debugger/tree/protocol_v1.1.  The hxcpp-debugger that is installed via ‘haxelib install’ is generally not the latest or best working version. (The Haxe Foundation maintainers do not release regular updates for it). Instead, get the current sources locally: Install git and clone the repository from http://github.com/HaxeFoundation/hxcpp-debugger and install via
    haxelib git hxcpp-debugger <your_local_clone> protocol_v1.1
    

    Then, you’ll have the version that matches the plugin. Whenever you need to update the debugger to the latest sources, do a ‘git pull’ and then rebuild your app.

  • Re-build your project using this newest debugger haxelib.
  • Configure your haxe program to start the debugger when the following command line option is provided:
          -start_debugger
    

    If you expect to do remote debugging, you’ll also have to support:

          -debugger_host=[host]:[port]
    

    Most likely you’ll just want to add the following in your main() when

    -start_debugger

    is set:

          new debugger.HaxeRemote(true, host, port);
    

    Generally speaking, the build/debug configuration (Run->Edit Configurations)
    is set up to use port 6972, so you can probably cheat and use:

          new debugger.HaxeRemote(true, "localhost", 6972);
    

    However, the line has to match your debug settings. Fortunately, they are passed to your program on the command line. Notice the

    -start_debugger -debugger_host=localhost:6972

    passed to haxelib:

          C:/HaxeToolkit/haxe/haxelib.exe run lime run C:/temp/issue349/openfl_cpp_debug/openfl_cpp_debug/project.xml
          windows -verbose -Ddebug -debug -args -start_debugger -debugger_host=localhost:6972


Your program should now:

  1. Look for the
    -start_debugger

    parameter before doing anything. It won’t be there if the program is being started via the “Run” command from IDEA.

  2. Parse the
    -debugger_host=

    parameter. If it exists, then a remote controller (e.g. IDEA) will be trying to connect on that port.
    If it doesn’t exist, then the user (you) probably want to start the command line debugger:

    new debugger.Local(true);

Here’s a snippet you can use: (Thanks to @isBatak)

#if (debug && cpp)
  var startDebugger:Bool = false;
  var debuggerHost:String = "";
  var argStartDebugger:String = "-start_debugger";
  var pDebuggerHost:EReg = ~/-debugger_host=(.+)/;
  for (arg in Sys.args()) {
    if(arg == argStartDebugger){
      startDebugger = true;
    }
    else if(pDebuggerHost.match(arg)){
      debuggerHost = pDebuggerHost.matched(1);
    }
  }

  if(startDebugger){
    if(debuggerHost != "") {
      var args:Array<String> = debuggerHost.split(":");
      new debugger.HaxeRemote(true, args[0], Std.parseInt(args[1]));
    }
    else {
      new debugger.Local(true);
    }
  }
#end


Installation

Where to get the plug-in

Most users don’t have to “get” the plug-in anywhere, as there is an automatic installation built into IDEA.  See “Install the plugin using IDEA” (below).

Published versions of the Haxe plug-in for IDEA are available through JetBrains’ plug-in repository and github.

Pre-release and feature test versions are available at github.


Installing IntelliJ IDEA

If you don’t have IntelliJ IDEA (or Android Studio or another of JetBrains’ products) installed, you will need to download and install the program using your operating system’s normal installation methods.  We recommend using IntelliJ IDEA Ultimate so that the full feature set of the plugin will be available.  However, the Community Edition is just fine for most purposes.  Debugging is the major feature that is not supported in CE (JetBrains’ limitation).  IDEA is found at https://www.jetbrains.com/idea.

When downloading, the latest regular release is recommended.  Early Access (EAP) versions are not tested and not officially supported by the plugin team.  We do appreciate bug reports, though!

When installing, a large number of optional features, languages, frameworks, etc. are presented for installation.  We recommend installing the minimum set that you will normally use.  Every optional feature installed slows IDEA both during startup and at run-time.  (Because IDEA’s internal architecture asks every plugin whether it has to be involved at every operation, — for example, indexing, find, completion — and many plugins provide functionality as “embedded languages” in another source file).


To install the plugin using IDEA (from the IntelliJ Plug-in Repository)

Install and start IDEA.

If you do not have a project open in IDEA (and after first-time setup):

  1. On the IDEA welcome screen, select “Configure(dropdown)->Plugins”
  2. Click on the “Browse Repositories…” button.
  3. Type ‘haxe’ to see the description for the plugin.
  4. Select ‘Install’ to install it.
  5. Allow IDEA to restart and initialize the plugin.

If you already have a project open in IDEA:

  1. Open the Settings dialog (File->Settings…)
  2. Highlight “Plugins” in the leftmost column
  3. Click on the “Browse Repositories…” button.
  4. Type ‘haxe’ to see the description for the plugin.
  5. Select ‘Install’ to install it.
  6. Allow IDEA to restart and initialize the plugin.

To manually install the latest or a previous Github release

Download the `intellij-haxe.jar` file from the release you want from Github releases.
More recent releases have begun to be named `intellij-haxe-<release>.jar`, where <release> is the version of Idea for which the Jar is built. (e.g. `intellij-haxe-17.jar`)
Make sure that you pick the proper one for your release.  A message should pop up and warn you if a release is incompatible.

If you do not yet have a project open in IDEA (and after first-time setup):

  1. On the IDEA welcome screen, select “Configure(dropdown)->Plugins”
  2. Click “Install plugin from disk…”
  3. Select the “intellij-haxe.jar” file you downloaded
  4. Allow IDEA to restart and initialize the plugin.

If you already have a project open in IDEA:

  1. Open the Settings dialog (File->Settings…)
  2. Highlight “Plugins” in the leftmost column
  3. Click “Install plugin from disk…”
  4. Select the “intellij-haxe.jar” file you downloaded
  5. Allow IDEA to restart and initialize the plugin.


IntelliJ IDEA Documentation

JetBrains’ official plugin installation documentation is at https://www.jetbrains.com/idea/plugins/.
The Haxe plugin page is https://plugins.jetbrains.com/plugin/6873?pr=idea.


IntelliJ-Haxe

The Haxe plug-in for IntelliJ IDEA is a language support product that allows IDEA to understand the Haxe language.  It provides full IDE support including colorizing, compilation, refactoring, and debugging.  It requires IntelliJ-IDEA Ultimate or Community Edition and works with versions 14.x through 2017.1.  (There are different releases for each version of IDEA.)

Published versions of the product are available through JetBrains’ plug-in repository and github.

Pre-release and feature test versions are available at github.

Short History

The plug-in was first created by JetBrains in 2012.  In the summer of 2013, the primary developer left JetBrains and the company was no longer interested in supporting the product.  At the community’s request, JetBrains licensed the plug-in under the Apache 2.0 open source license and published the source code on github.  For a while, they maintained a minimal amount of interest, merging community changes and so forth, but soon abandoned the project entirely.

TiVo, who was a main user of the code, decided to support and maintain the plug-in for their internal development.  They published their changes to the community via their own github fork which became the de-facto repository.  Eventually, TiVo also lost interest in continuing full-time support and development of the project.  (It isn’t a product that they made income from, after all.)

In January 2017, Eric Bishton, the project’s maintainer for TiVo, decided to create a company to develop and support the product full time.  He commenced efforts to move TiVo’s fork of the repository to the Haxe Foundation, where it resides today.  He continues to maintain the project.

In November 2018, JetBrains agreed to make their (now outdated) repository a fork of the Haxe Foundation github repository, completing the transfer of the project entirely to the Haxe user community.